
How to use Shielding Paint, how to plan for shielding paint, how to prepare, how to apply, how to cover shielding paint
Watch RIGHT NOW the ‘DEFINITIVE SHIELDING PAINT Webinar’ REPLAY
When thinking about using shielding paint, there is a lot you should know. It is not difficult, but there are a lot of logical considerations you wouldn’t think of by yourself and even many EMF consultants do not know the finer points. We invented T98 shielding paint from a holistic view point to have allowable ingredients and high performance. It does however still need to be planned for well, prepped for, placed in a holistically logical approach, applied properly and your finish needs consideration. All of shielding paint considerations and in-depth detail is covered in Patrick’s DEFINITIVE SHIELDING PAINT WEBINAR which is sometimes held LIVE, but also available as replay here.
2.5 hours of details you will want to know (or skip through or come back to), from the people famous for the holistic approach to shielding and creating healthier bedrooms.
ACCESS the Definitive Shielding Paint Webinar REPLAY RIGHT NOW
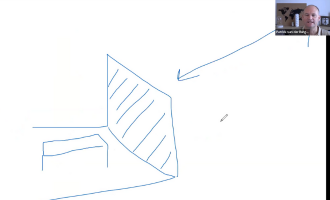


Shielding Paint Instructions
The application of shielding paint is not difficult and is something you can do yourself inside the home. It handles like normal paint and with the right tools you’ll do a fine job. To achieve the results you wanted, meaning a worthwhile reduction in EMF radiation exposure from transmitted signals like 5G … AND… creating a healthy bedroom when considering the paint’s ingredients that need to be carefully chosen… you do need a product designed by those with a true wholistic approach to this subject and claimed performance based on independent testing. Despite is being more costly, you have these criterial well covered with T98 shielding paint and given it’s independently tested performance provides exceptional value for money. Better product means better chance of achieving the desired results. You don’t want to save money on shielding paint… you end up doing a poor job with possibly ingredients that don’t agree with you long term. Use the good stuff… You’re worth it.
1. What you need to apply shielding paint
Order your products well ahead of time and have them ready for your project. You’ll need:
- Enough Shielding Paint for 3 (or 2) layer applications (1L of T98 will cover 8m2 for 1 coat, 4m2 for 2 coats or 2.6m2 for 3 coats).
- Grounding tape (minimum quantity guide would be: enough to go around the room, up wall and across the long end of the ceiling)
- GPA mesh for the floor if desired or needed (allow 10% for overlapping and I suggest 15% for wastage in small rooms or 10% for wastage in larger rooms)
- Grounding hole band/strapping found in our store for use with GPA mesh. This is easy to bend, cut and work with.
- Disposable brushes to do the edges
- ‘Rough surface rollers’ (the ones with ‘hair’ on them. Napier 10 or 12)
- Paint tray
- Paint Mixing drill attachment
- Timber to stir with between paint tray top-ups
- Drop sheets to protect your floor and drape over ceiling fans etc.
- Masking tape to secure drop sheets and tape of edges you don’t want paint on
- Plastic wrap (like people put over food containers or sandwiches) to seal in your brush or roller during pauses in painting
- Scissors (to cut tape)
- Rags for removing spills (you’ll be amazed how little T98 drips) and to help apply grounding tape
- Screw drivers to perhaps remove power outlets (turn of electrical circuits involved before doing this)
- Perhaps some ‘ground’ electrical cable depending on your chosen method of connecting to ground
How to Shielding Paint videos
2. How to prep your walls for shielding paint application
Same as with normal paint, the surface should be clean and a light sand would be good. Be careful with old paints already on the wall as it could be lead based paint. If you’re unsure, ask your local paint shop for a test kit or advise.
T98 Shielding Paint is a water bases (acrylic) paint. It was specially designed with not only exceptional RF radiation reduction as the goal, but also for it to be a healthy product that would fit into a wholistic approach to health. This is something we feel, we are totally alone in. T98 has very low VOC level and makes for a healthy bedroom and home on more than 1 level.
- If you have an acrylic paint you will be painting over, then T98 can go straight on it.
- If you have an oil based paint to go over, you’ll have to put a layer of special primer on first. Ask your local paint store for a healthy option.
- If you are painting a previously unpainted wall with shielding paint, then you want to put a quick coat of under coat on to take away the suction. Shielding paint is most costly and its a bit of a waste to spend in on suction. This is especially true for concrete walls and ceilings.
You may want to place drop sheets and tape of edged you don’t want paint on.
IMPORTANT: If you are dealing with previously unpainted surfaces, especially concrete, these surfaces will have a higher suction and will absorb a percentage of what you apply. As shielding paint is more costly that primer/under coat, it is advisable to apply a coat of primer/under coat to the new wall just to get rid of the suction with a cheaper material. After this, you follow the normal application as described here.
3. How to stir shielding paint
T98 shielding paint has a high concentration of graphite and carbon in it, to make the paint highly electrically conductive and give it its radio frequency deflecting abilities. It has been a long time since GEOVITAL invented shielding paint and it has been improved many times. The particals in the paint will settle in the bucket or bottle and will need to be stirred very well after opening. We urge you to use a paint mixer drill attachment, so you can ensure good mixing. Make sure to stir all areas of the bucket and leave no settles graphite and carbon untouched. You’ll not get nice smooth consistency, a bit like pancake mix.
Whilst you apply your first section of paint and use the paint in the paint tray that you have poured the paint into, the graphite and carbon will start to settle again in the bucket. When it comes time to top-up your paint tray, you don’t need the drill again (you can) but you could use a timber stick or manual paint stirrer to stir the shielding paint before you pour more into your paint tray. Fail to this and you’ll find more liquid paint midway in the bucket and by the time you come to the end, it will start to get thick again.
Stirring your shielding paint is very important. If you use trades people to do the painting for you, you will want to make sure they stir it right. You don’t want to find most of the shielding paint components that give it shielding, to be left in the bottom of the bucket.
4. How to apply shielding paint – Roller and Brushes to use
Using a rough surface roller (a napier 10 or 12 would be fine) you can roll shielding paint onto the wall using a paint tray. It goes a lot further than you might think. The trick is to not put it on too thin. You want to put a nice coat on. You also need the paint the edges and corners. You may want to paint them first before finishing the coat with the roller.
5. How to determine you applied enough shielding paint for your RF protection
You should calculate how much paint you expect to use for the amount of coats you’re planning to apply. Typically 3 or 2 coats. From there you can work out how much you should roughly use for each coat. The first coat always takes a bit more than subsequent shielding paint application. Once you have done the first coat, you should review how much you used and compare it with what you calculated you needed. If there is big difference (too little used) then you put it on the wall too thin. You’ll then simply have to roller an extra layer on to make sure you used near the calculated amount to achieve the shielding effectiveness.
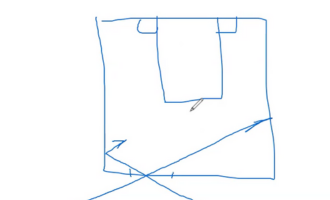
6. How to apply grounding tape during shielding paint application
The routing of the grounding tape needs some forethought. Your consultant that did the assessment and knows your home can help with this. The theory is that you want all of the painted panels (never shield just one wall in a bedroom) to be electrically connected via the grounding tape. This against shifts in the home where hairline cracks may disconnect one area from the rest. For this reason we don’t believe in the use of grounding plates which are an unattractive eye sore at the best of times but when not connected with grounding tape that spans the space, their connection with other panels may fail. We recommend just tape and simple lead it into the cavity of a power outlet and connect it t ground there, or run a cable from the tape to a dedicated grounding stake.
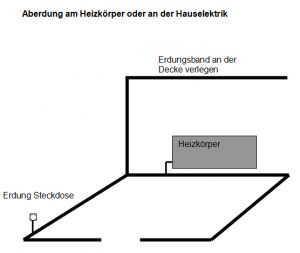
You need to go around the room (not around the wall or ceiling panel), up and onto the ceiling and along one side of the ceiling panel. Approaches can vary but this gives you a rough idea. Again, ask your consultant for assistance. – You can join one end to the start of a new peice of grounding tape when the grounding tape has a highly electrically conductive adhesive (ours does and ours is a special brushed metal for good paint contact). Do try and avoid joins though… its therefor better to have 1 or a few BIG rolls of grounding tape instead of several smaller rolls and you come to the end of the roll all the time.
Use a rag to press the grounding tape firmly onto your shielding paint and be careful not to stretch it. Use scissors to cut it. In these videos you see the old take we used to use many years ago. We now use a metal tape instead which handle much easier.
Make sure you think ahead on how to make your connection to ground. You might want to ask your electrician ahead of time. Most people lead it into the cavity of the power outlet and connect it to the ground that is available there. You can use multiple outlets if your run of grounding tape around the room was interrupted by a door for example.
WARNING: If you do use more than one power outlet to ground to, the should not be from different electrical circuits.
7. Second (and third) coat of shielding paint application
Once the grounding tape is in place and you’ve checked that its application does indeed see tape on all painted panels and you are able have the connection to ground made by an electrician later, it is time for your subsequent coats of shielding paint. Perhaps follow the same order; Apply shielding paint to the corners and edges with a brush, after which you roller the larger areas. You’ll typically find you’ll use a little bit less paint on subsequent coats.
How many coats of shielding paint should I apply?
During an assessment in the home and ideally a body assessment to see how much RF radiation is absorbed in the body, you’ll get an appreciation of how high the levels are ‘today’. At this point in time (slowly introduction of 5G) we recommend the following:
- For shielding against electric fields from wiring alone, a single coat is sufficient.
- For shielding against radio frequency (RF) radiation the application of at least 2 coats has been standard for many years.
- When RF levels high or cell phone towers have a direct line-of-sight view of your home, then 3 coats are recommended.
- When wanting to be prepared for the increases of the future, a 3rd coat makes a lot of sense as it is so easy to apply with the others.
T98 shielding paint gives exceptional performance and has always been made to also protect well against higher frequencies which now proves invaluable with the introductions of Airfibre and 5G. During independent testing of professionally prepared test panels as well as testing of many test panels prepared by ordinary families, T98 keep showing to be ahead of the rest, is successfully applied by the non-trained and above this all designed with a wholistic approach to health.
8. Shielding doors with shielding paint
Doors can just be painted with brush and small roller as needed. Doors are typically not grounded as the connection with ground would be hard to make and there is no electric wiring on the other side of the door. For doors with a lot of glass, consider securing some NOVA shielding fabric onto the door to cover the glass.
Door typically don’t need to be kept completely closed to get good results with T98. Even a shielded door that is half open will close the hole in your shielding significantly and often dramatically improve the result in contrast with leaving the door unshielded. A body assessment should ideally be used to verify the results of shielding and a body assessment in our experience would also reveal if inferior products were used.
9. Does shielding paint block natural magnetic field signals?
No it doesn’t. Watch the video to show you this. The frequency of natural magnetic field signals is too low to be shielded against, the same way why magnetic fields from transmission lines and local distribution lines can’t be shielded against.
10. How to over-paint shielding paint and hide the black
Once you have applied the shielding paint and confirmed you did use approximately what you calculated you should need (if not you may want to add another layer as you may have put it on too thin), it is time to paint your freshly shielded room or house in a more fashionable look. To hide the black shielding paint, normally 2 layers of white primer/undercoat will do the trick. There is a trick that painters use… If let’s say, your top coat colour will be blue, then they use 1 drip of dark blue in the primer to give it more covering power. If you want to end up with a beige, then a drip of dark brown would be used. If you wanted to to end up with a yellow wall, then dark yellow would be used. Ask a painter… they really do this.
With your walls returned to close-to-white, you’re now ready to over-paint with your desired top coat as usual.
As T98 shielding paint is such a healthy paint with near zero VOC benchmarked against the use with patients, it would make sense to purchase top coats with a no or near zero VOC as well to cover all bases from a health perspective.
Connecting to ground
Once the shielding is in place, you may then get the electrician to connect your shielding to ground. This is not difficult and you could probably do this yourself, but an electrician can verify that ground is indeed properly available in the outlet or can make sure a dedicated grounding stake is installed in the right location.
Summary of how to shield a room against 5G and other EMF radiation sources with Shielding Paint
You can do this! It is not difficult and with the right quality shielding paint designed for a overall wholistic approach to health, you are bound to get great result in reducing your EMF radiation exposure AND creating a healthy environment at the same time (those are not necessarily the same thing).
If you are a painter: You’ll find this a fascinating project. Today you are not just a home decorator, but you are in health care. Make sure you are totally confident with your grounding tape application. It is easy, but you need to follow specific principles to make it do what it is there for.
If you’re an amateur: You’ll be so proud of yourself when you’re done and will agree it was not difficult. The key is in preparation and understanding WHY you do things and WHY you are using that specific shielding paint. Not all EMF consultants critically analyse the heritage of products they work with or don’t realise the deceptive marketing used. You have to take control of this conscious choice of materials. Look at who is behind it. What is their goal and how did they get where they are now.
With T98 Shielding Paint you have the best option for your shielding project. You want to do this right the first time.
If you are an EMF consultant: You too can enable and encourage your clients to use T98 shielding paint, designed and benchmarked against health client and independently tested. Talk to us.
Good luck with your shielding project and we look forward to receiving a photo of you midway in your shielding project!
Patrick van der Burght
Senior Managing Partner GEOVITAL INTERNATIONAL
Director and Host of Health Stronghold
Domestic Radiation Specialist, International Speaker and EMF Consultant Trainer
Total project shielding paint videos
AN IMPORTANT PS:
I am not encouraging anyone to start shielding a home or bedroom without proper professional input. The application of shielding paint done correctly will enhance any home but it is unlikely to be the only source of radiation exposure that should be mitigated against and there could be problems that are unfixable and even shielding paint won’t fix. Get an on-site assessment done first (find our consultants or myself, here. if we’re not close, we do travel also internationally) and find out what the total story is. Then mitigate. Good luck.
EMF Q&A Videos
EMF Q&A
Some time ago, we dedicated months to welcoming live questions on anything EMF-related. That initiative has ended, but some of the answers are on YouTube. See some here.

